
Installing a doorbell camera is one of the most effective ways to enhance home security, deter suspicious activity, and monitor visitors in real time. At Safe Dwelling Security LLC, our security professionals regularly help homeowners understand proper doorbell camera installation for both wired and wireless models. This step-by-step guide explains how to choose the right mounting location, connect power or batteries safely, pair the device with your smartphone, and optimize motion alerts, ensuring reliable performance and clear video monitoring from anywhere.
What You’ll Need Before Installing a Doorbell Camera
- Doorbell camera (wired or battery-powered)
- Mounting bracket and screws (included)
- Drill and screwdriver
- Wall anchors (for brick or stucco)
- Smartphone with a camera app installed
- Stable Wi-Fi connection (2.4GHz preferred)
- Voltage tester (for wired models)
Estimated time: 30–45 minutes
Skill level: Beginner (DIY-friendly)
Step-by-Step: How to Install a Doorbell Camera
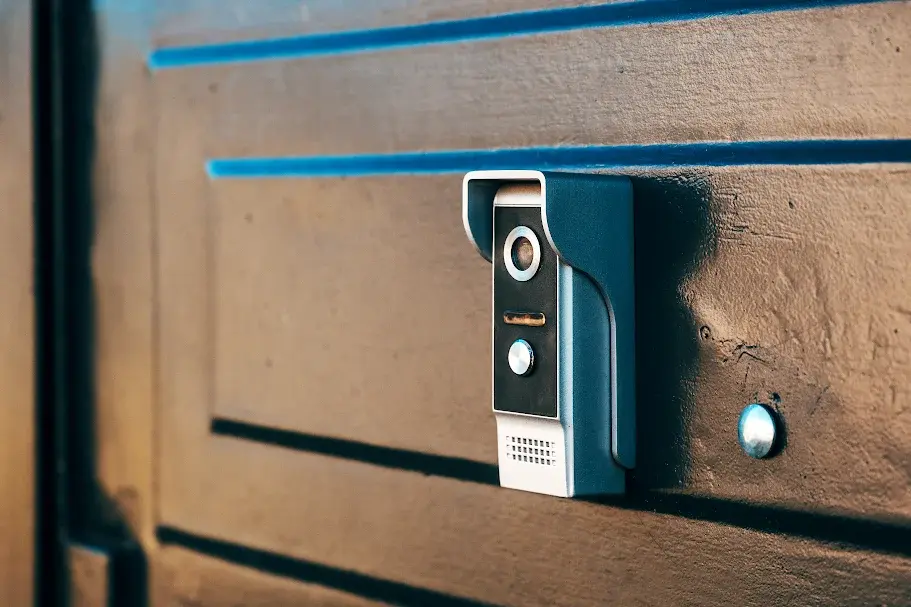
Step 1: Choose the Best Location
The correct placement ensures clear video and accurate motion detection while supporting reliable internet solutions for uninterrupted video streaming and alerts.
Best mounting height:
48–52 inches from the ground
Placement tips:
- Position the camera to capture faces, not just the chest
- Avoid direct sunlight or reflective surfaces
- Ensure a strong Wi-Fi signal at the door
| Expert Tip: Angle the camera slightly downward to reduce false motion alerts. |
Step 2: Turn Off Power (Wired Doorbell Cameras Only)
For safety, switch off the circuit breaker connected to your doorbell.
- Use a voltage tester to confirm wires are not live
- Never touch exposed wiring before testing
| Safety Note: This step prevents electrical shock and device damage. |
Step 3: Install the Mounting Bracket
The mounting bracket keeps your camera stable and correctly aligned.
- Hold the bracket against the wall
- Mark drill points
- Drill holes and insert anchors if needed
- Secure the bracket firmly
| Why it matters: A crooked bracket can distort video and reduce motion accuracy. |
Step 4: Connect the Doorbell Camera
How you connect depends on the model type.
For wired models:
- Attach existing doorbell wires to the camera terminals
- Tighten connections securely
For wireless models:
- Fully charge the battery before installation
- Insert the battery according to the manufacturer’s instructions
| Pro Tip: Clean wire ends to ensure a strong electrical connection. |
Step 5: Attach the Camera to the Bracket
Secure the camera to the mounted bracket by snapping or screwing it into place.
- Make sure it sits flush
- Lightly shake to confirm stability
A firm attachment prevents vibration and recording issues.
Step 6: Connect the Doorbell Camera to Your Smartphone
Smartphone setup enables live video, alerts, and recordings.
- Download the manufacturer’s app
- Create or log in to your account
- Follow in-app Wi-Fi setup instructions
- Keep your phone close to the camera during pairing
| Test: Live view, notifications, and audio. |
Step 7: Test and Adjust Settings
Final testing ensures everything works correctly.
- Press the doorbell to test alerts
- Adjust camera angle if needed
- Configure motion zones and sensitivity
- Test night vision and audio
| Expert Recommendation: Reduce motion sensitivity to avoid false alerts from passing cars. |
Common Doorbell Camera Installation Mistakes to Avoid
- Mounting too high or too low
- Ignoring Wi-Fi strength
- Skipping power shut-off for wired models
- Not testing night vision
- Over-sensitive motion settings
Avoiding these mistakes improves performance and lifespan.
Conclusion
Installing a doorbell camera is a simple DIY project that significantly improves home security. By choosing the correct mounting height, securing the bracket, and configuring motion alerts properly, you ensure reliable video monitoring and real-time notifications. Both wired and wireless cameras provide peace of mind when installed correctly, allowing you to monitor visitors and protect your home anytime, anywhere.
FAQs
Can I install a doorbell camera by myself?
Yes. Most doorbell cameras are designed for DIY installation and can be installed in under an hour using basic tools.
Do doorbell cameras require Wi-Fi?
Yes. Wi-Fi is required for live video streaming, motion alerts, and remote access through your smartphone.
What is the best height to mount a doorbell camera?
The ideal mounting height is 48–52 inches above the ground, which provides clear facial recognition and accurate motion detection.
Are wired doorbell cameras better than wireless?
Wired cameras offer continuous power, while wireless models provide easier installation. The best choice depends on your home setup.
How long does it take to install a doorbell camera?
Most installations take 30–45 minutes, including setup and testing.